Only Professional Edition supports Platform Integrations feature.
Use SENTIENT Cloud or install your own platform instance.
In this guide, we integrate the ST-RMQTT with the SENTIENT using MQTT integration. We utilize ST-RMQTT client credentials with the type APPLICATION to connect SENTIENT integration as an APPLICATION client. APPLICATION clients specialize in subscribing to topics with high message rates. The messages will be persisted when the client is offline and will be delivered once it goes online, ensuring the availability of crucial data. Read more about the APPLICATION client here.
SENTIENT MQTT Integration acts as an MQTT client. It subscribes to topics and converts the received data into telemetry and attribute updates. In case of a downlink message, MQTT integration converts it to the device-suitable format and pushes it to ST-RMQTT. Pay attention: ST-RMQTT should be either co-located with the SENTIENT instance or deployed in the cloud and have a valid DNS name or public static IP address. SENTIENT instance that is running in the cloud can’t connect to the ST-RMQTT deployed in the local network with no internet connection.
Prerequisites
In this tutorial, we will use:
- The instance of SENTIENT Professional Edition installed locally;
- ST-RMQTT installed locally and accessible by SENTIENT Professional Edition instance;
- mosquitto_pub MQTT client to send messages.
ST-RMQTT setup
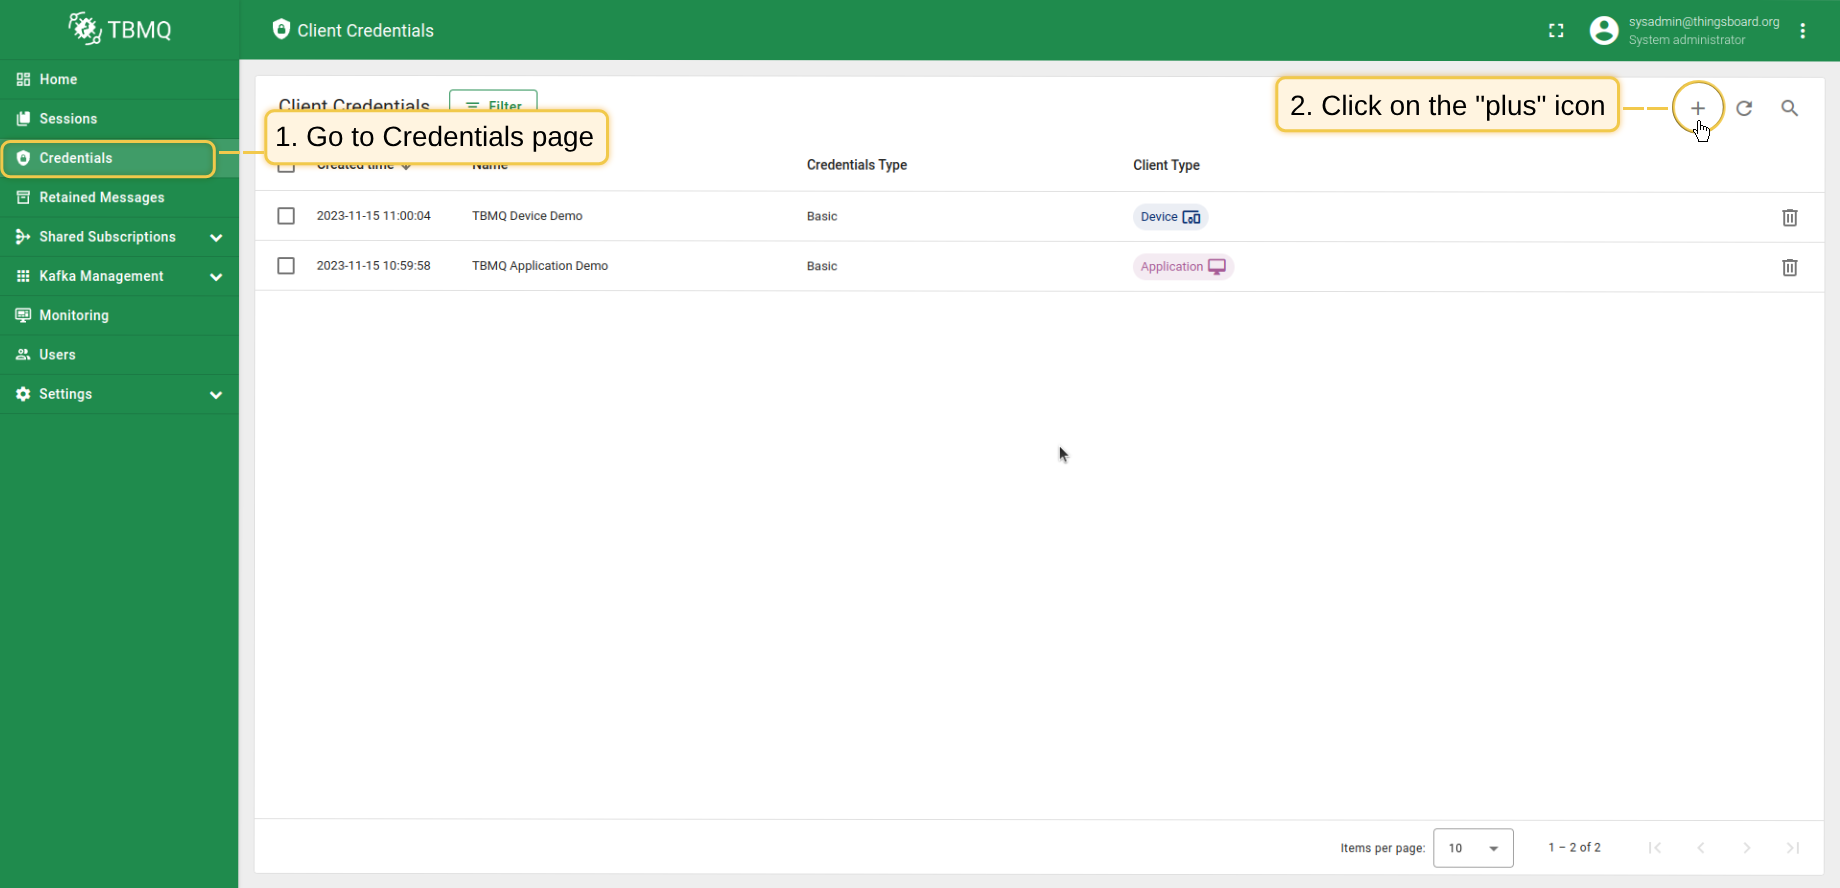
First, we need to create ST-RMQTT client credentials to use them for connecting SENTIENT integration to ST-RMQTT.
To do this, login to your ST-RMQTT user interface and follow the next steps.
- Navigate to "Credentials" tab, click on the "plus" icon in the top right corner of the table;
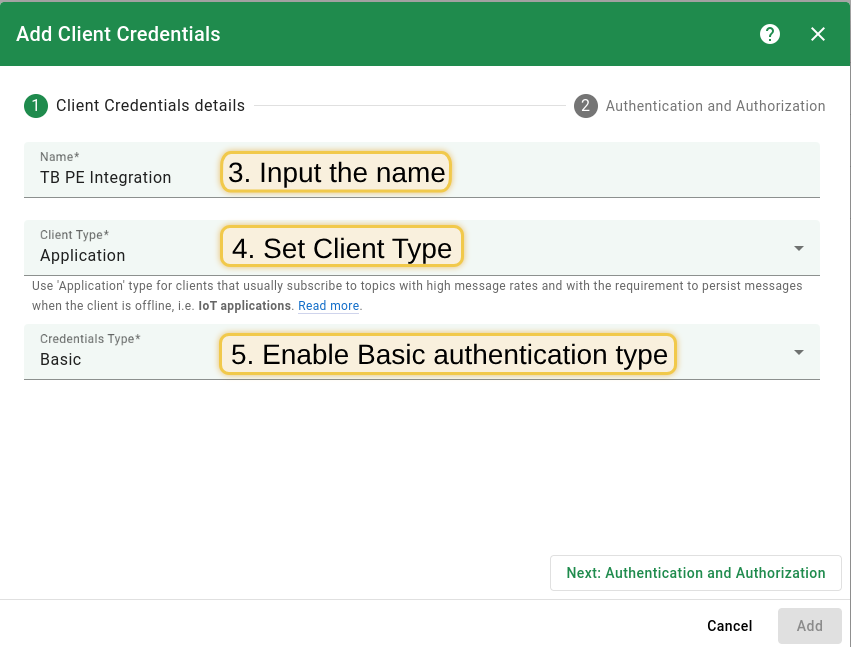
- Input client credentials name, select client type. Enable "Basic" authentication type.
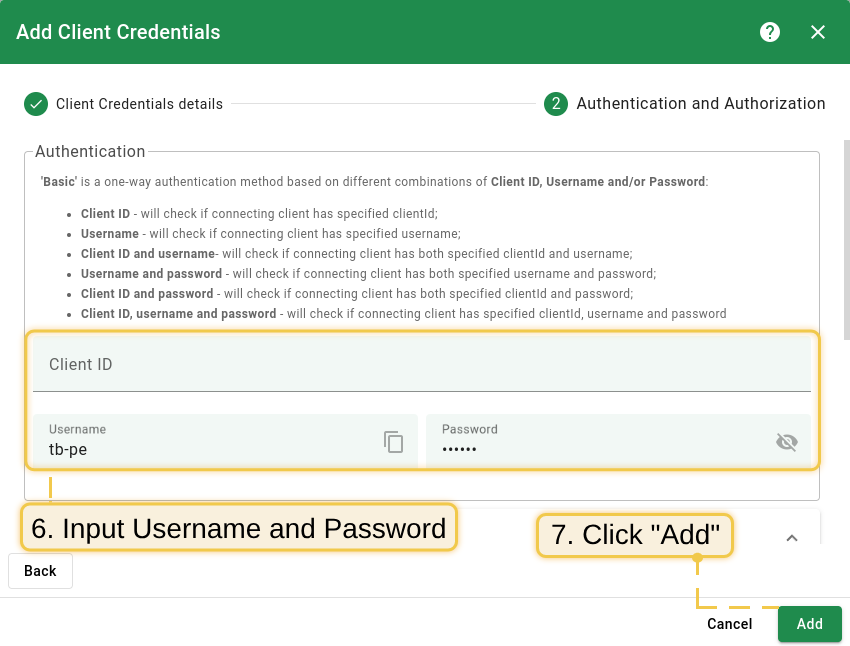
- Input "Username" and "Password" with chosen values. For example, use `tb-pe` value for Username and `secret` for Password fields. Click "Add" to save credentials.
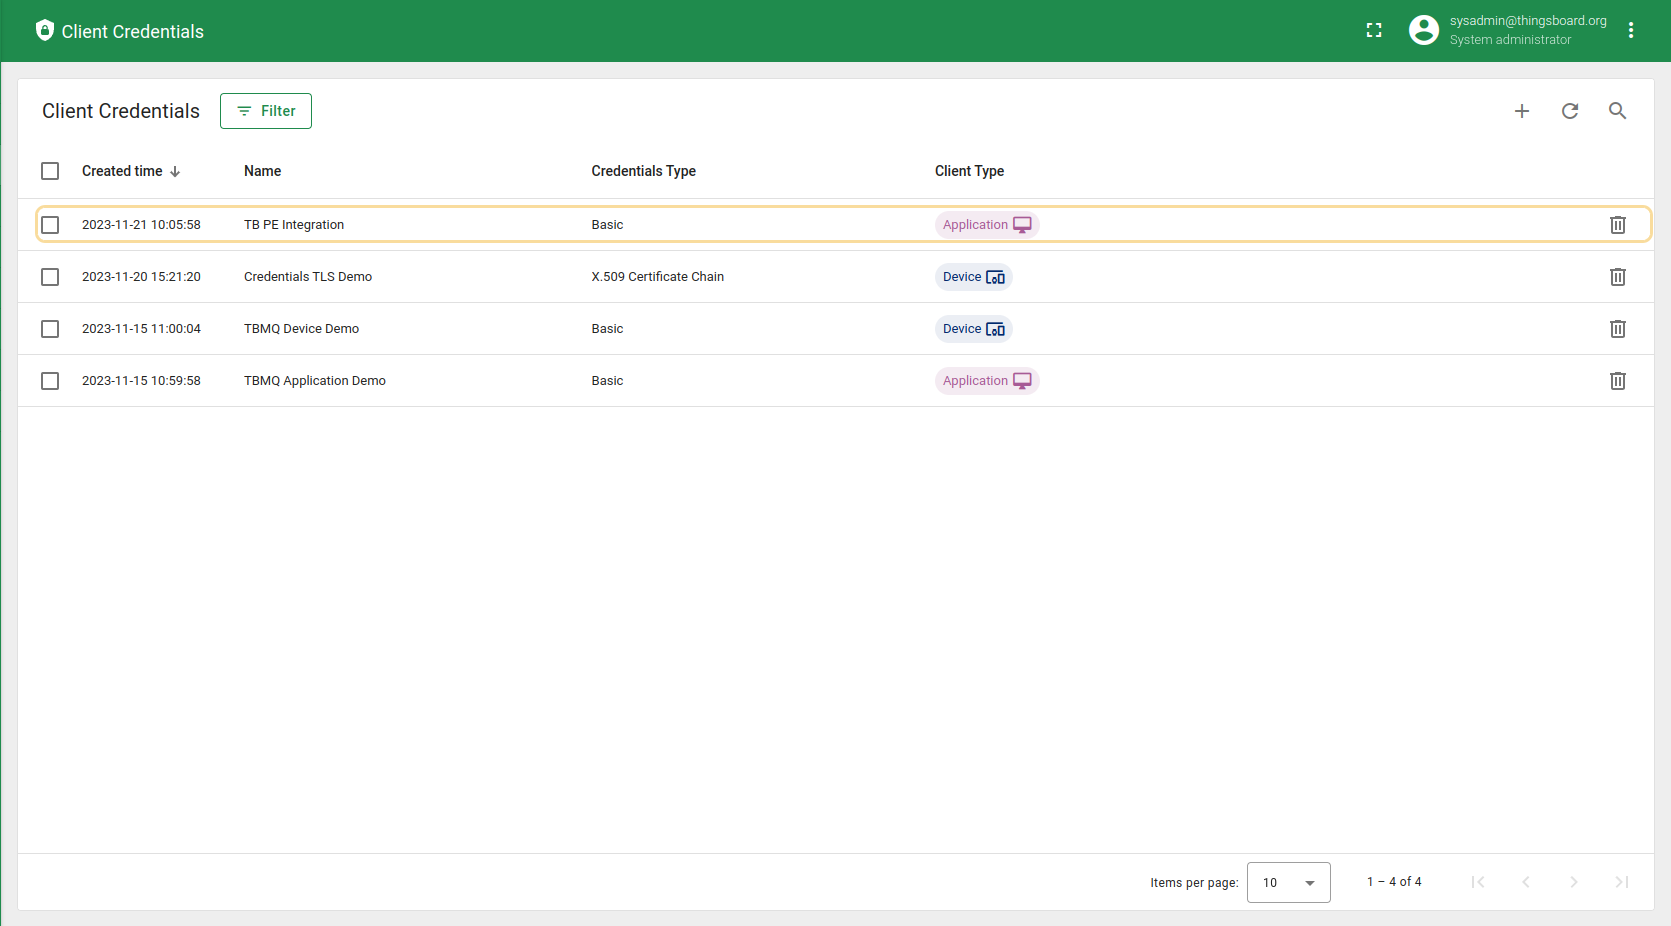
- New client credential is created.
Please note:
The Basic authenticaion must be enabled.
Now you can proceed to the next step - configuration of SENTIENT integration.
SENTIENT setup
In this example, we will use the MQTT integration to connect the SENTIENT to ST-RMQTT. Before setting up an MQTT integration, you need to create uplink converter.
Uplink Converter
The purpose of the decoder function is to parse the incoming data and metadata to a format that SENTIENT can consume.
To create uplink converter, go to the “Integrations center” section -> “Data converters” page and click on the “plus” icon. Name it “ST-RMQTT Uplink Converter” and select type “Uplink”. Paste the decoder script below into the decoder functions section. Click “Add”.
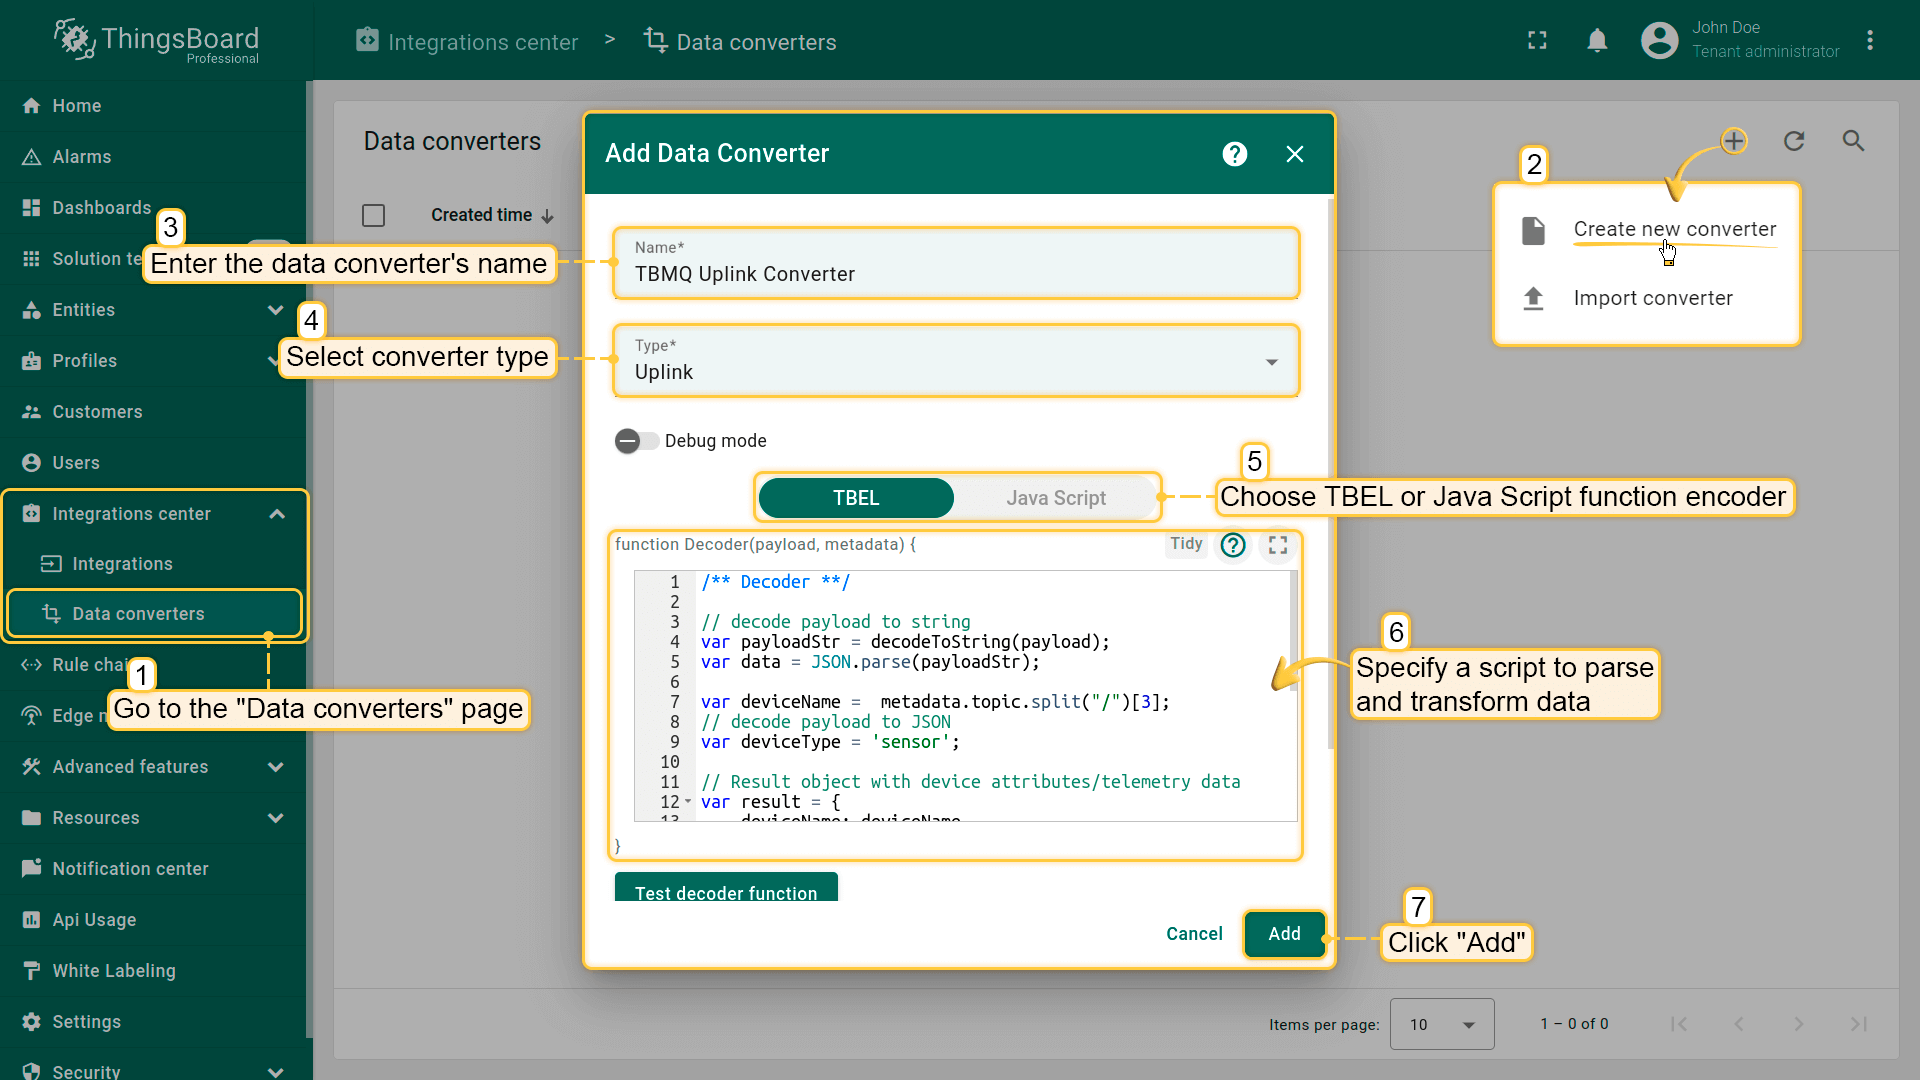
In our example, use the following script for the decoder function section:
One can use either TBEL (SENTIENT expression language) or JavaScript to develop user defined functions. We recommend utilizing TBEL as it’s execution in SENTIENT is much more efficient compared to JS.
|
|
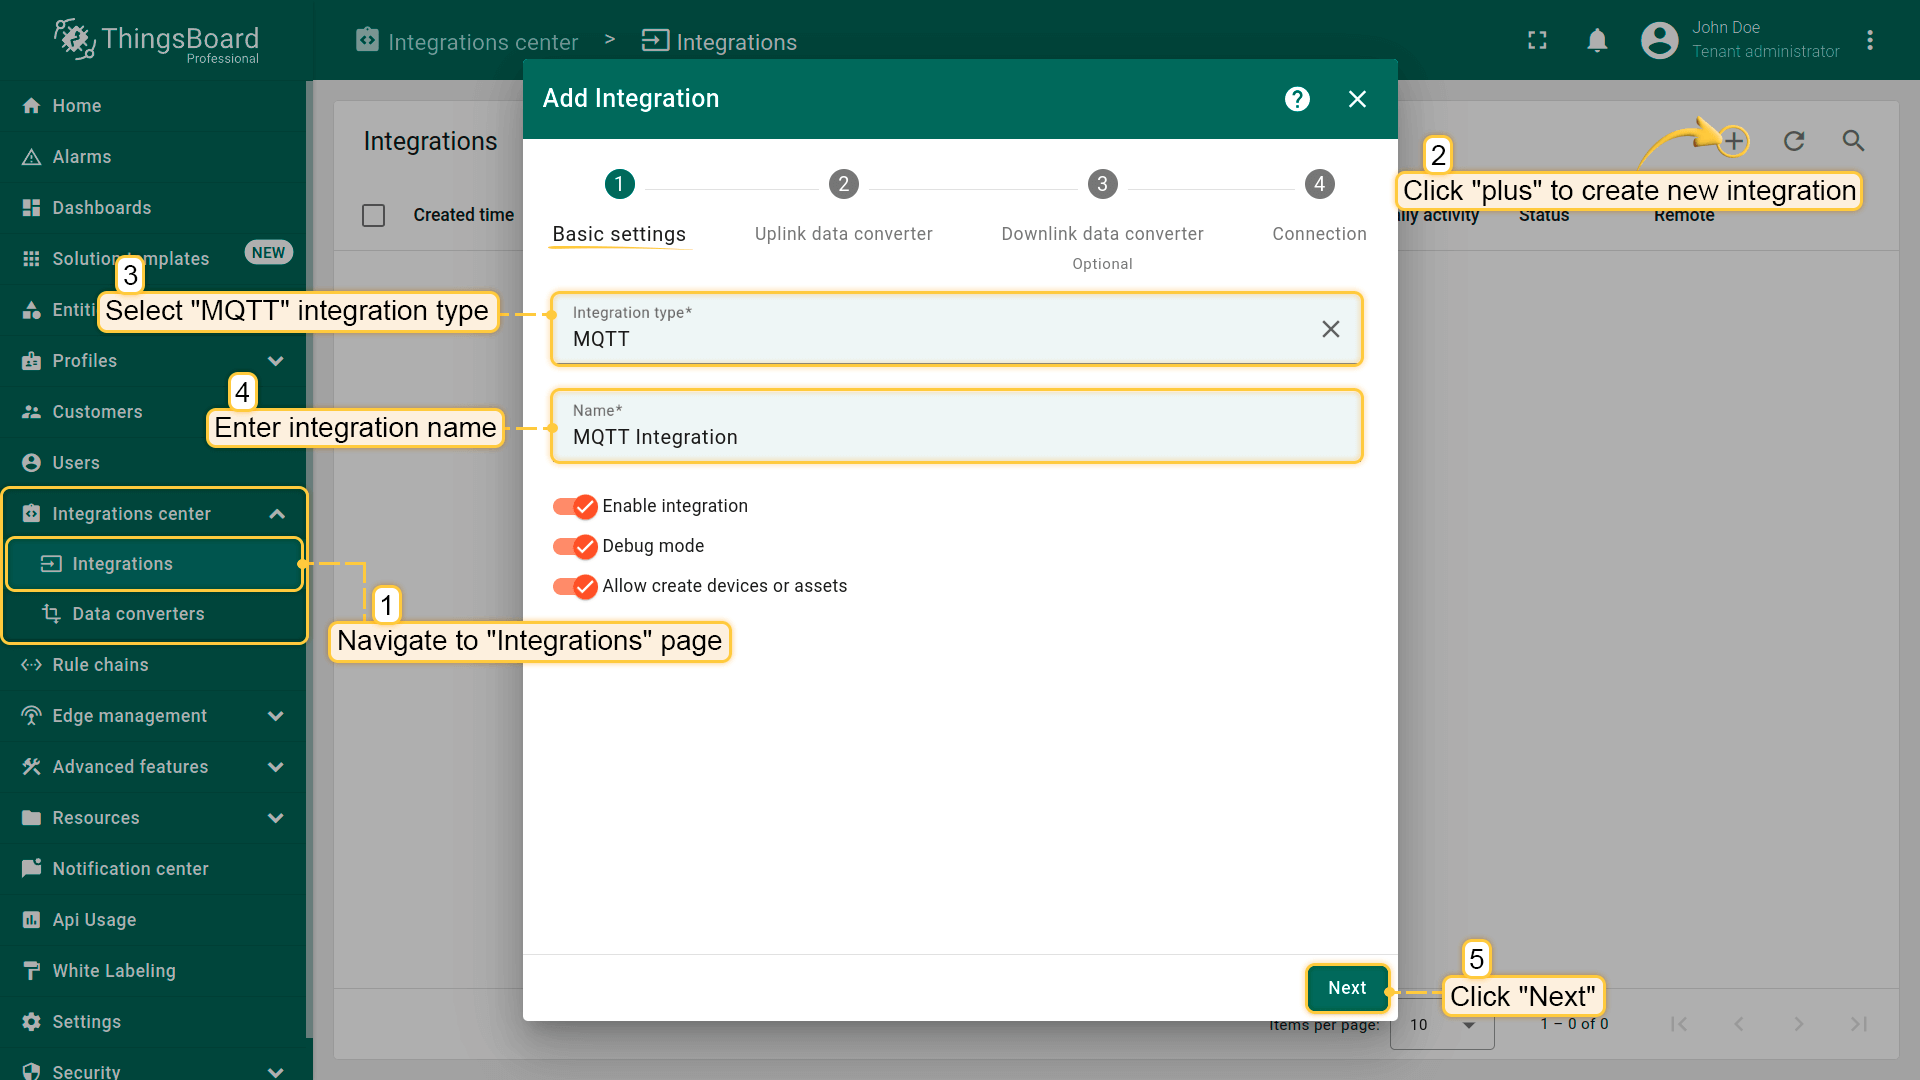
MQTT Integration Setup
Now create an integration.
- Go to the "Integrations center" section -> "Integrations" page and click "plus" icon to add a new integration. Name it "MQTT Integration", select type "MQTT";
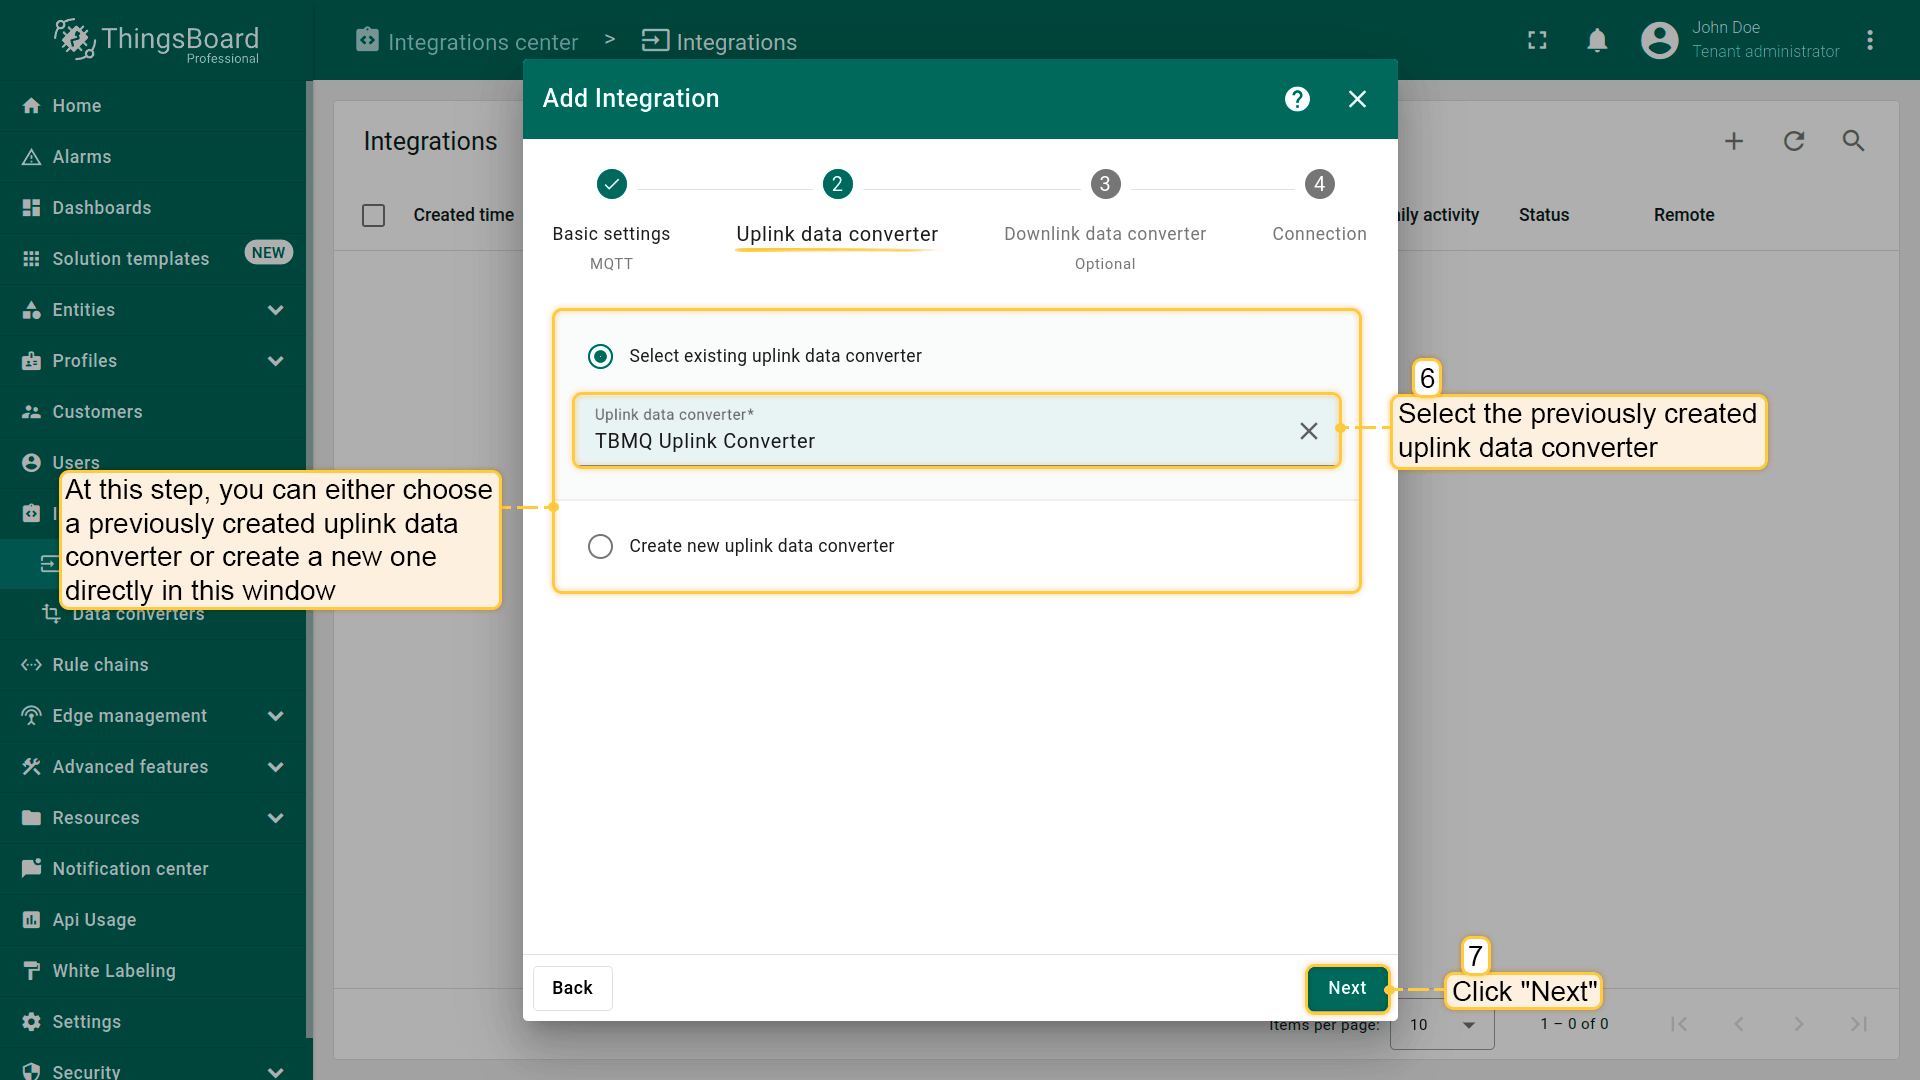
- Add the recently created uplink converter;
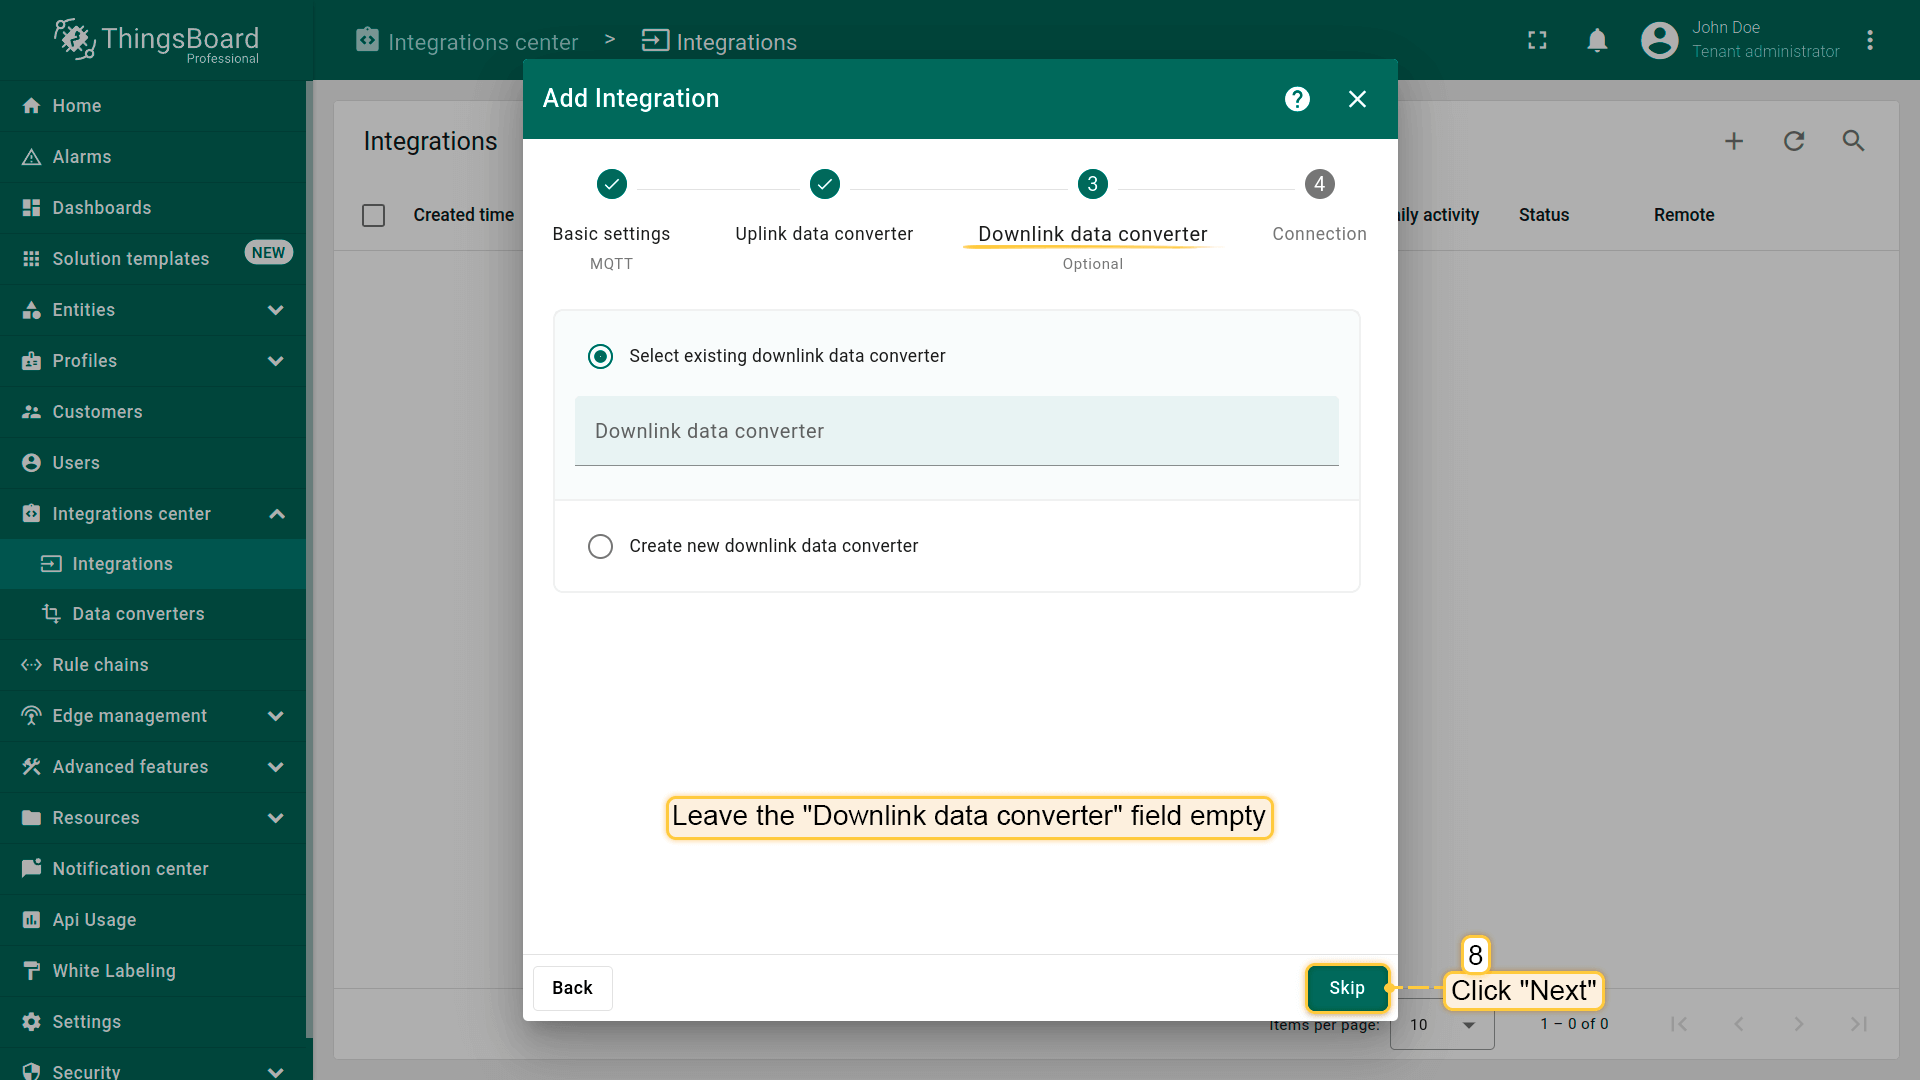
- Leave the "Downlink data converter" field empty. Click "Skip";
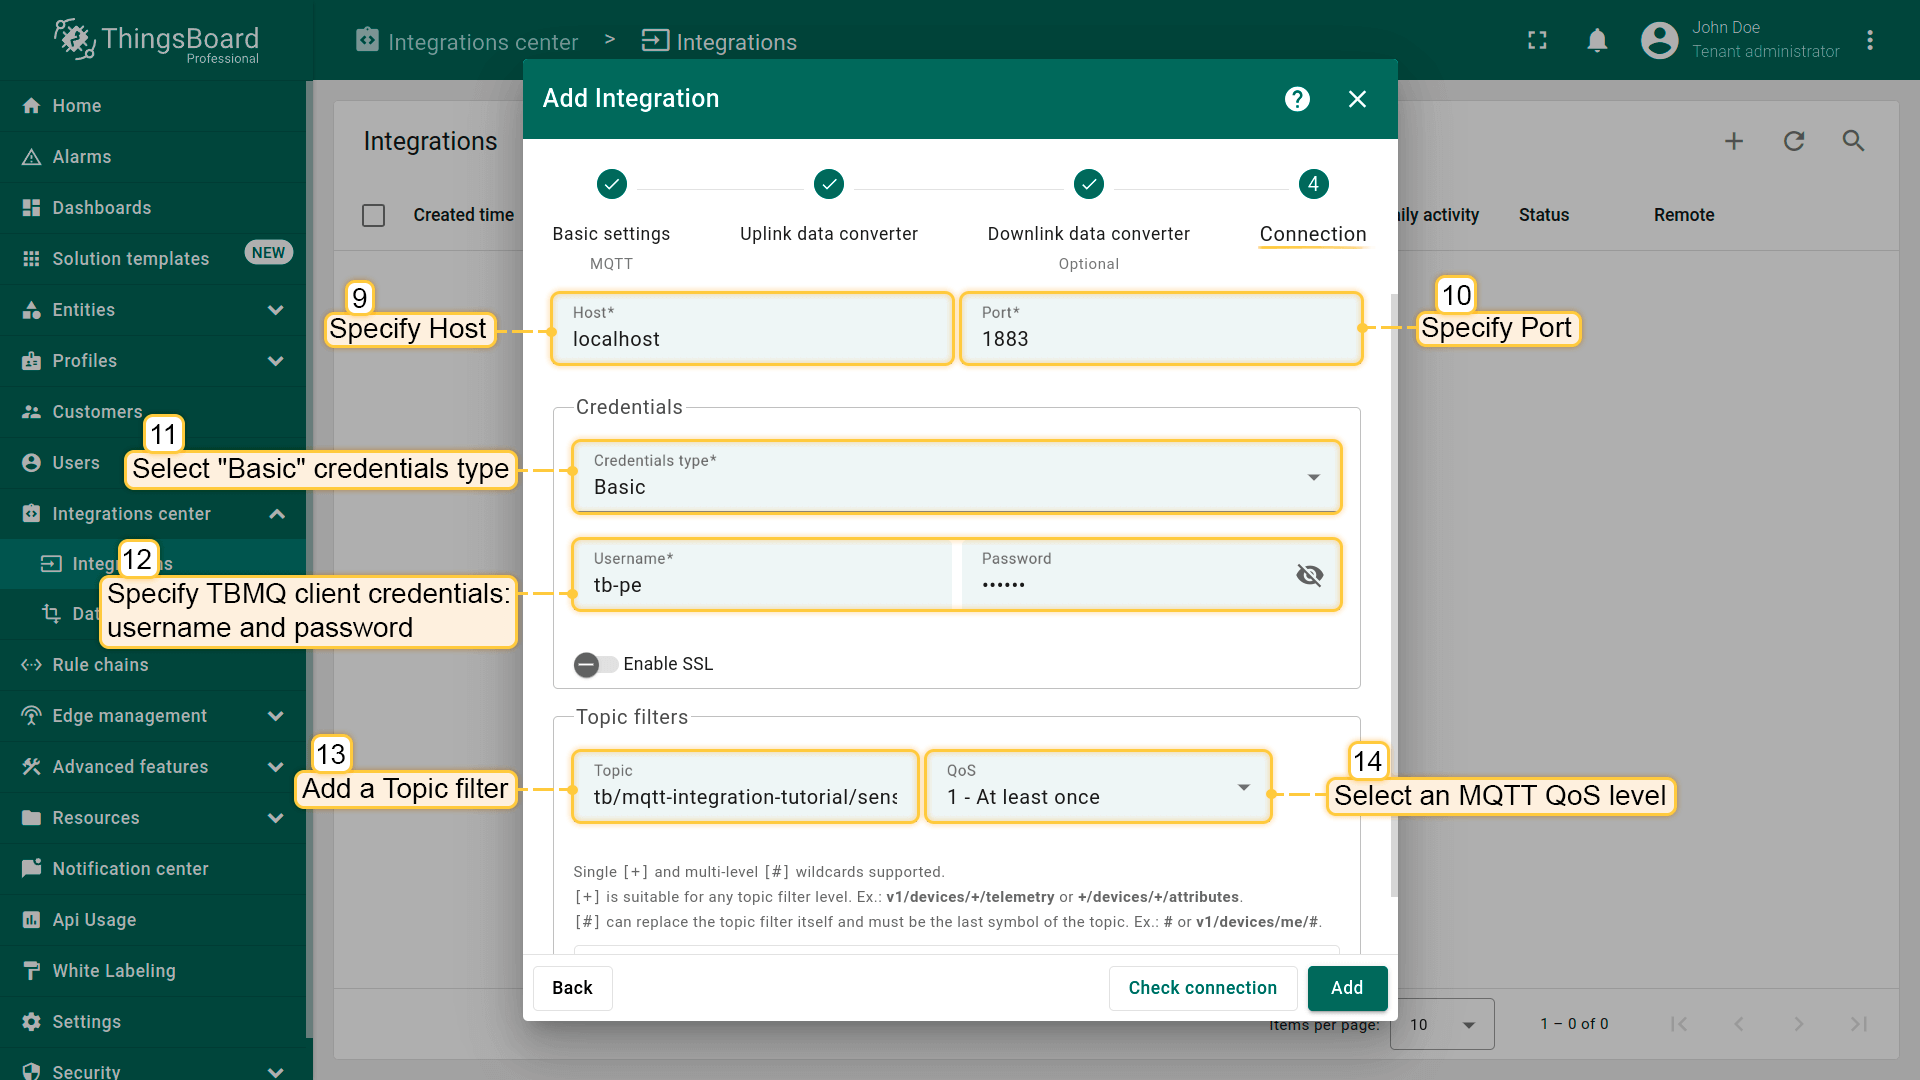
- Specify host and port of ST-RMQTT instance. Select "Basic" credentials type and specify ST-RMQTT client credentials. Add a topic filter: "tb/mqtt-integration-tutorial/sensors/+/temperature" and select an MQTT QoS level higher than 0;
- Now go to the advanced settings. Uncheck the "Clean session" parameter and specify client ID as `tbpeintegration`;
- [Optional] Click on Check connection button to check connection to ST-RMQTT. Click Add button to create the integration.
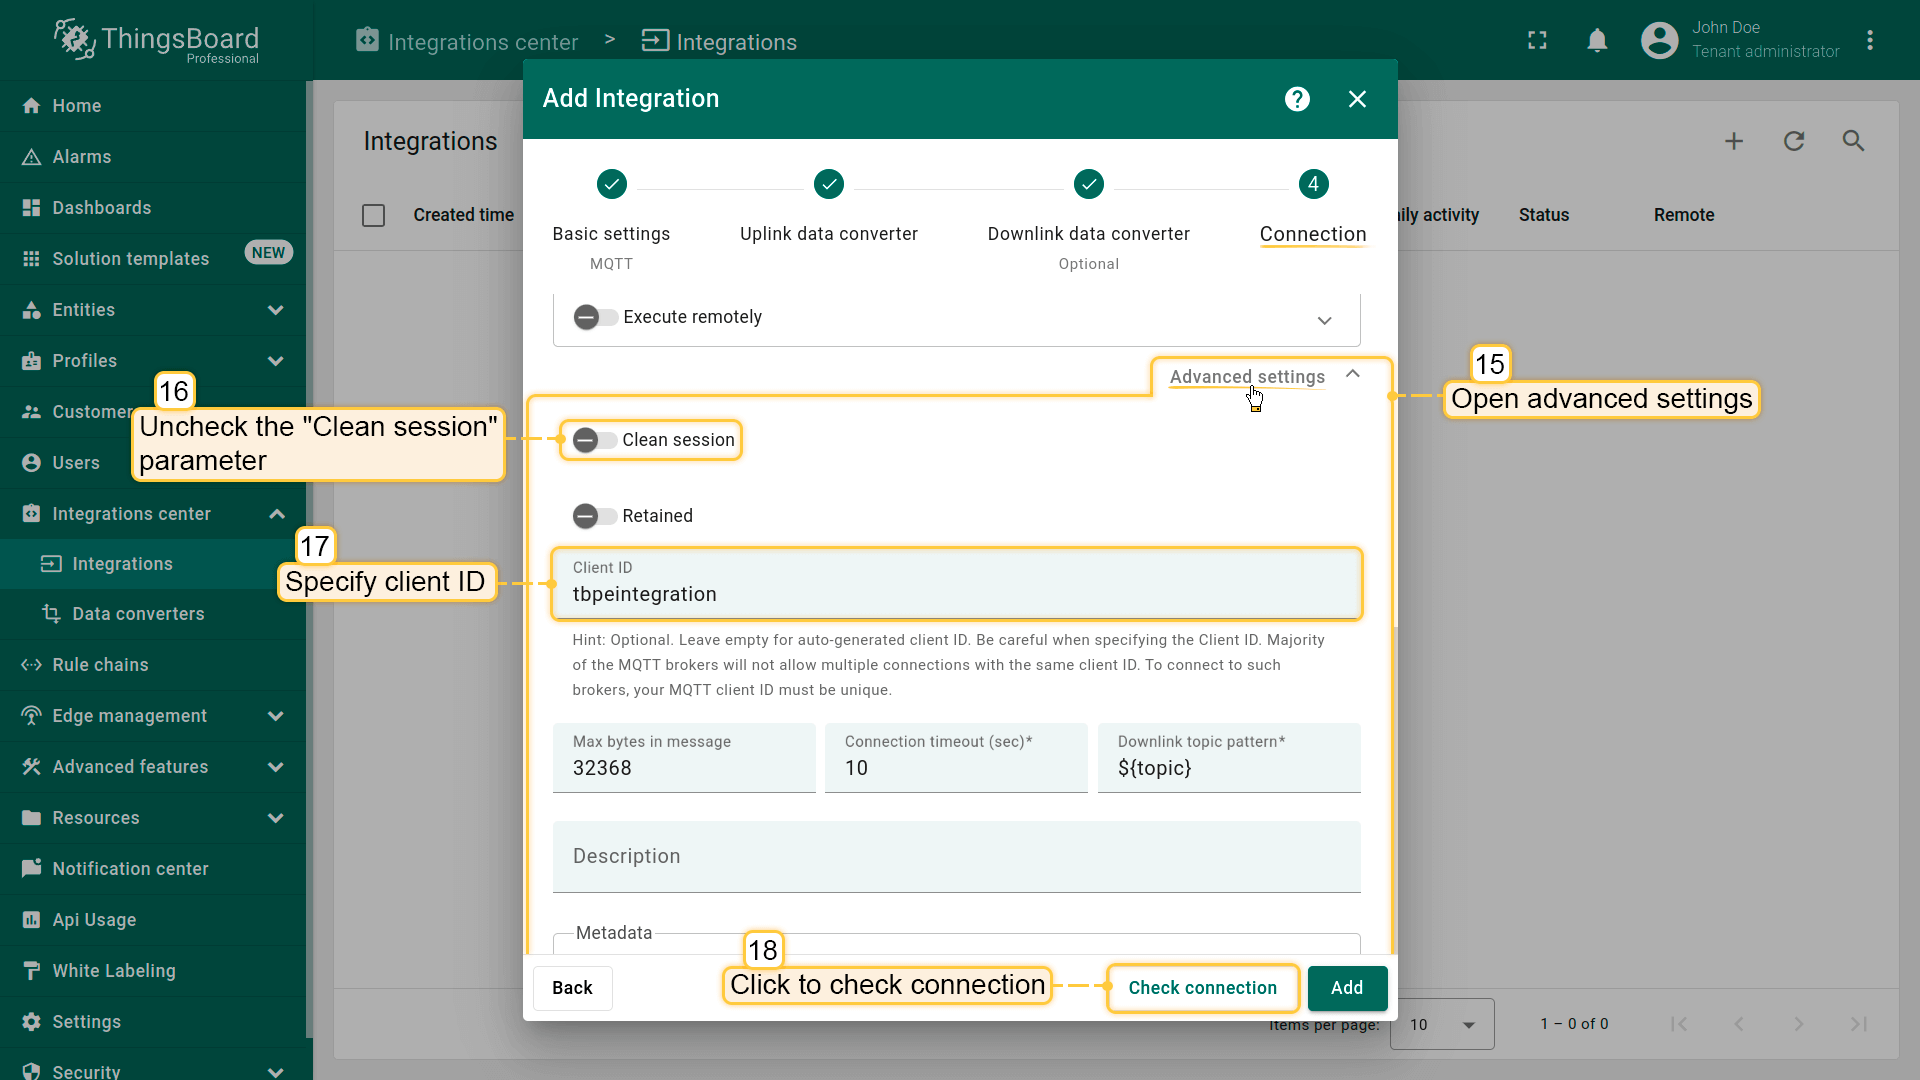
![[Optional] Click on Check connection button to check connection to ST-RMQTT. Click Add button to create the integration.](/images/mqtt-broker/user-guide/integrations/how-to-connect-tbqm-to-sentient/st-rmqtt-integration-add-integration-6-pe.png)
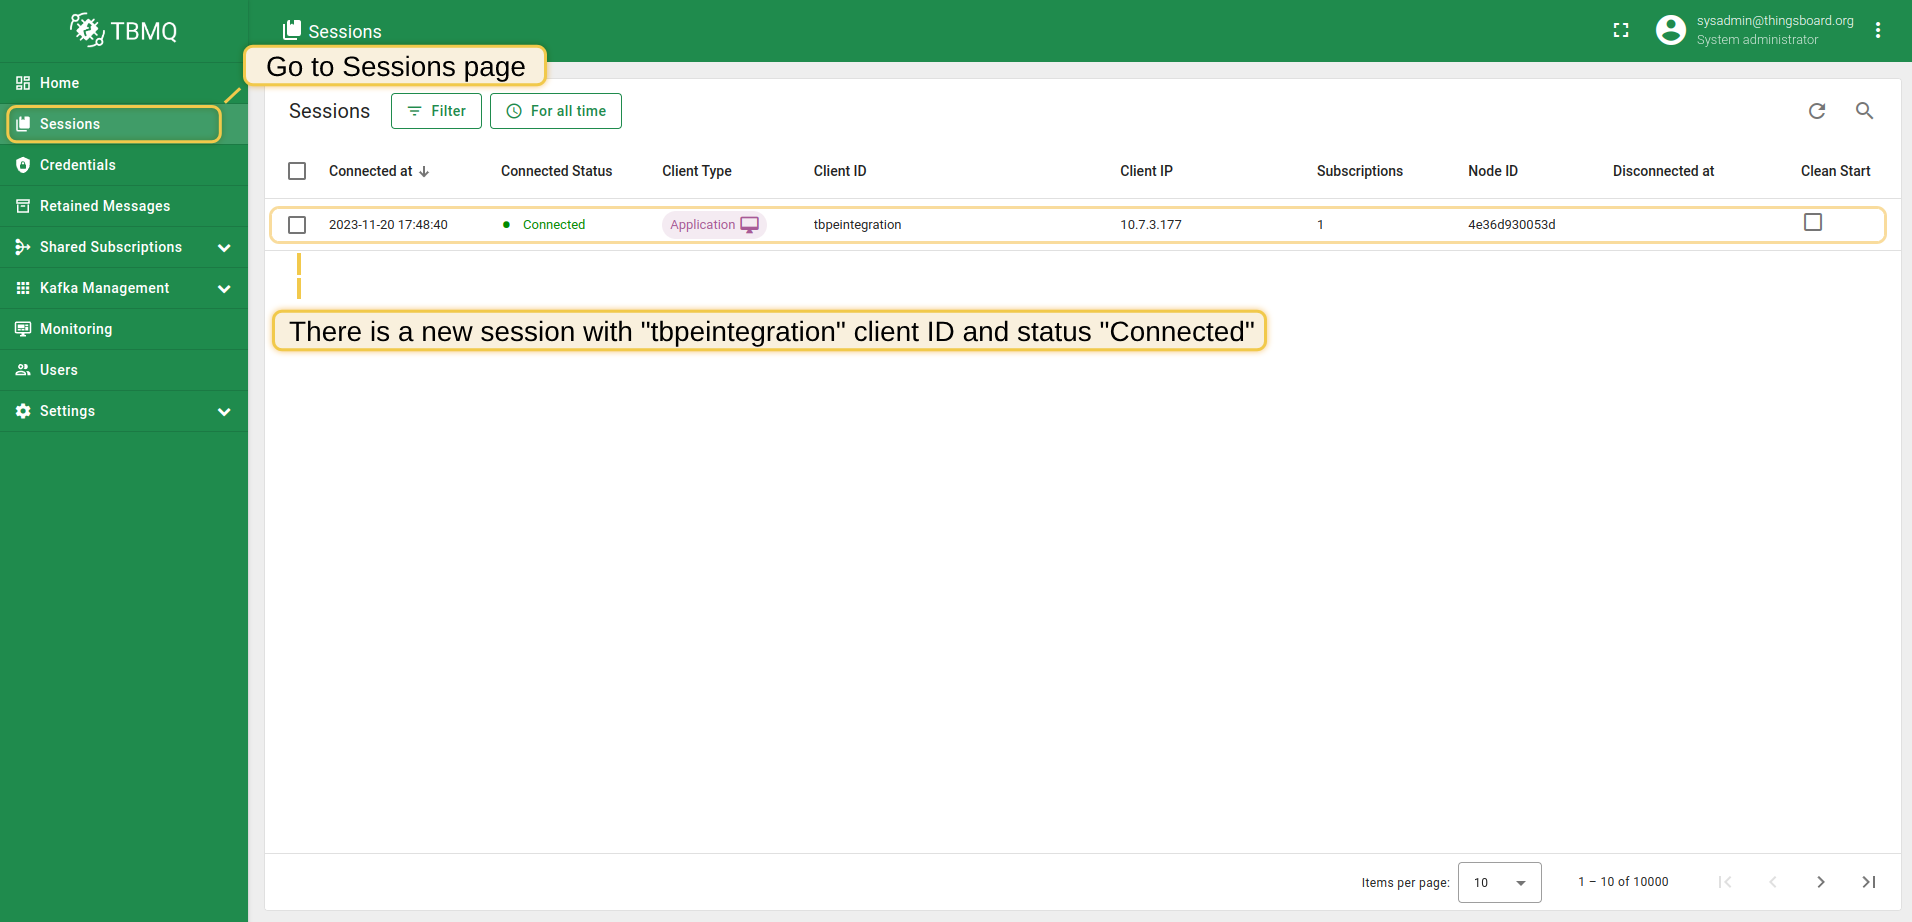
Now go to the “Sessions” page in the ST-RMQTT UI. Upon successful establishment of the connection between SENTIENT and ST-RMQTT, we will see a new session and its status - “Connected”.
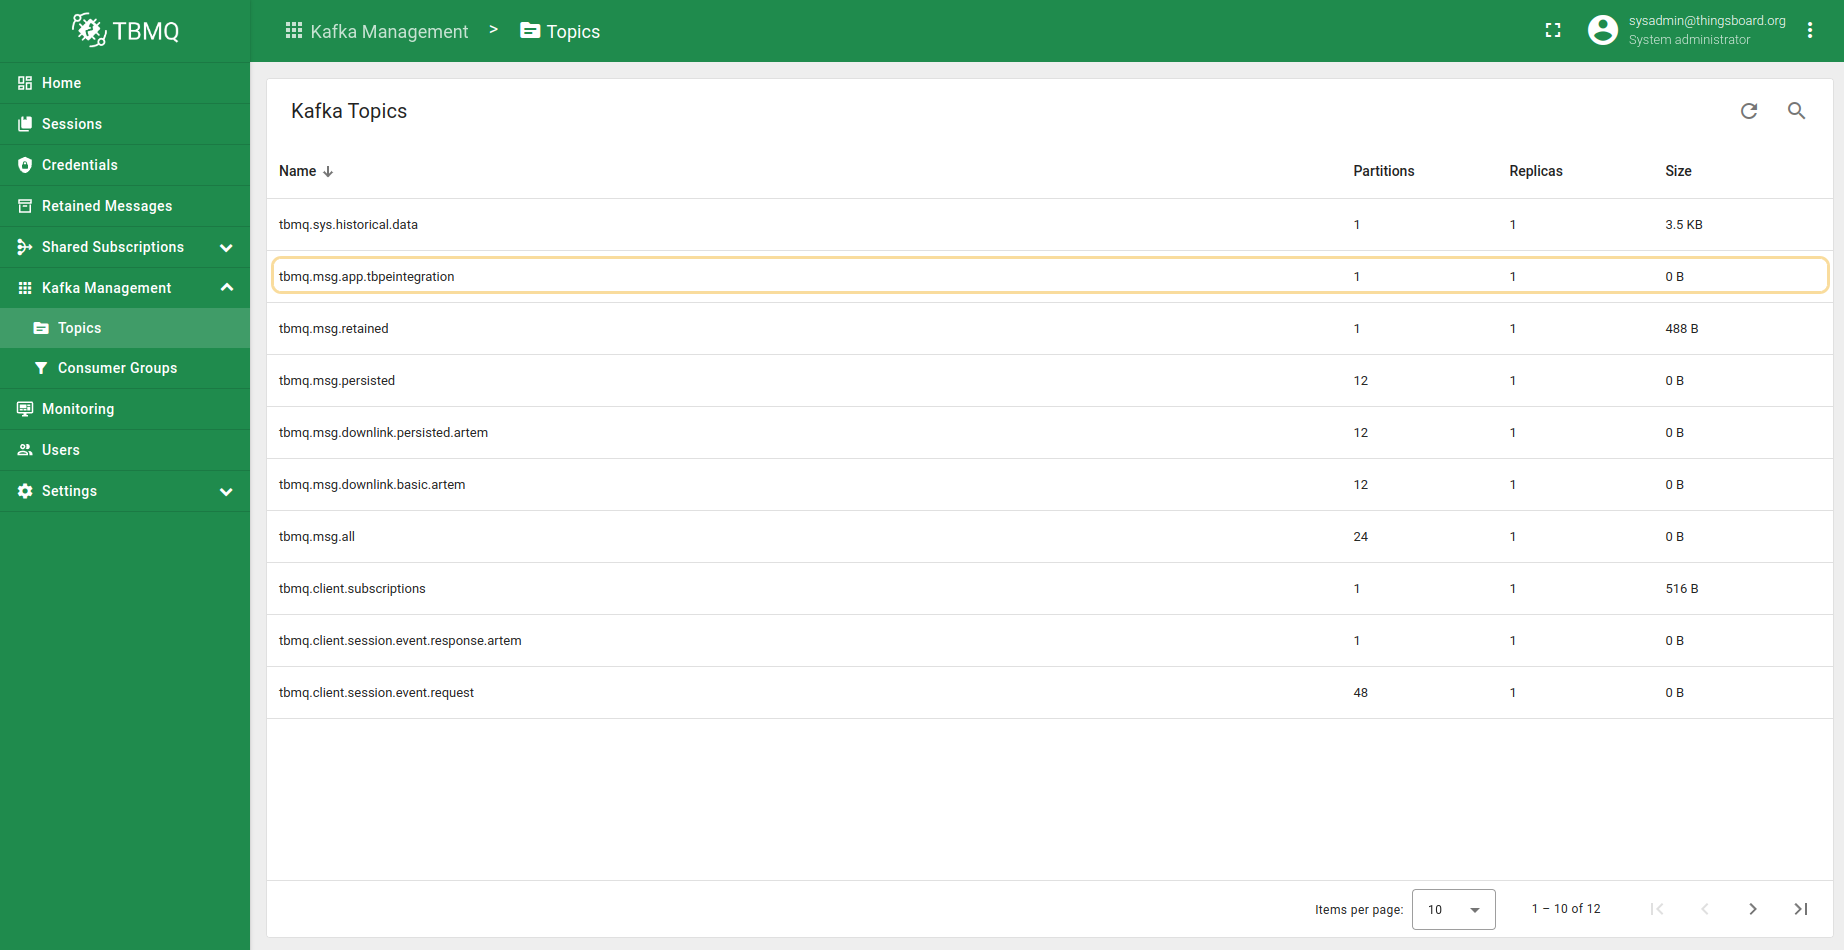
And on the “Topics” page of the “Kafka Management” menu section you will see a name of Kafka topic (which corresponds to the client ID specified in the MQTT integration), number of partitions, replication factor and size of the topic.
Send Uplink message
Now let’s simulate the device sending a temperature reading to ST-RMQTT.
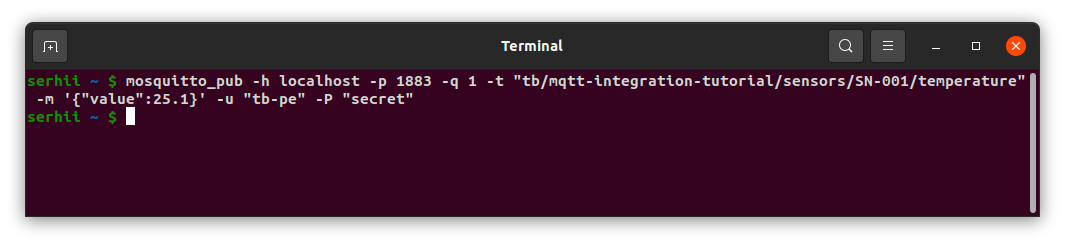
Open the terminal and execute the following command to send a message with temperature readings in a simple format: {"value":25.1} to the topic “tb/mqtt-integration-tutorial/sensors/SN-001/temperature”:
1
mosquitto_pub -h $SENTIENT_MQTT_BROKER_HOST_NAME -p 1883 -q 1 -t "tb/mqtt-integration-tutorial/sensors/SN-001/temperature" -m '{"value":25.1}' -u "username" -P "password"
Replace the $SENTIENT_MQTT_BROKER_HOST_NAME with the correct public IP address or DNS name of the broker, username and password values according to the specified ones in the provisioned credentials.
Use the following command for our example:
1
mosquitto_pub -h localhost -p 1883 -q 1 -t "tb/mqtt-integration-tutorial/sensors/SN-001/temperature" -m '{"value":25.1}' -u "tb-pe" -P "secret"
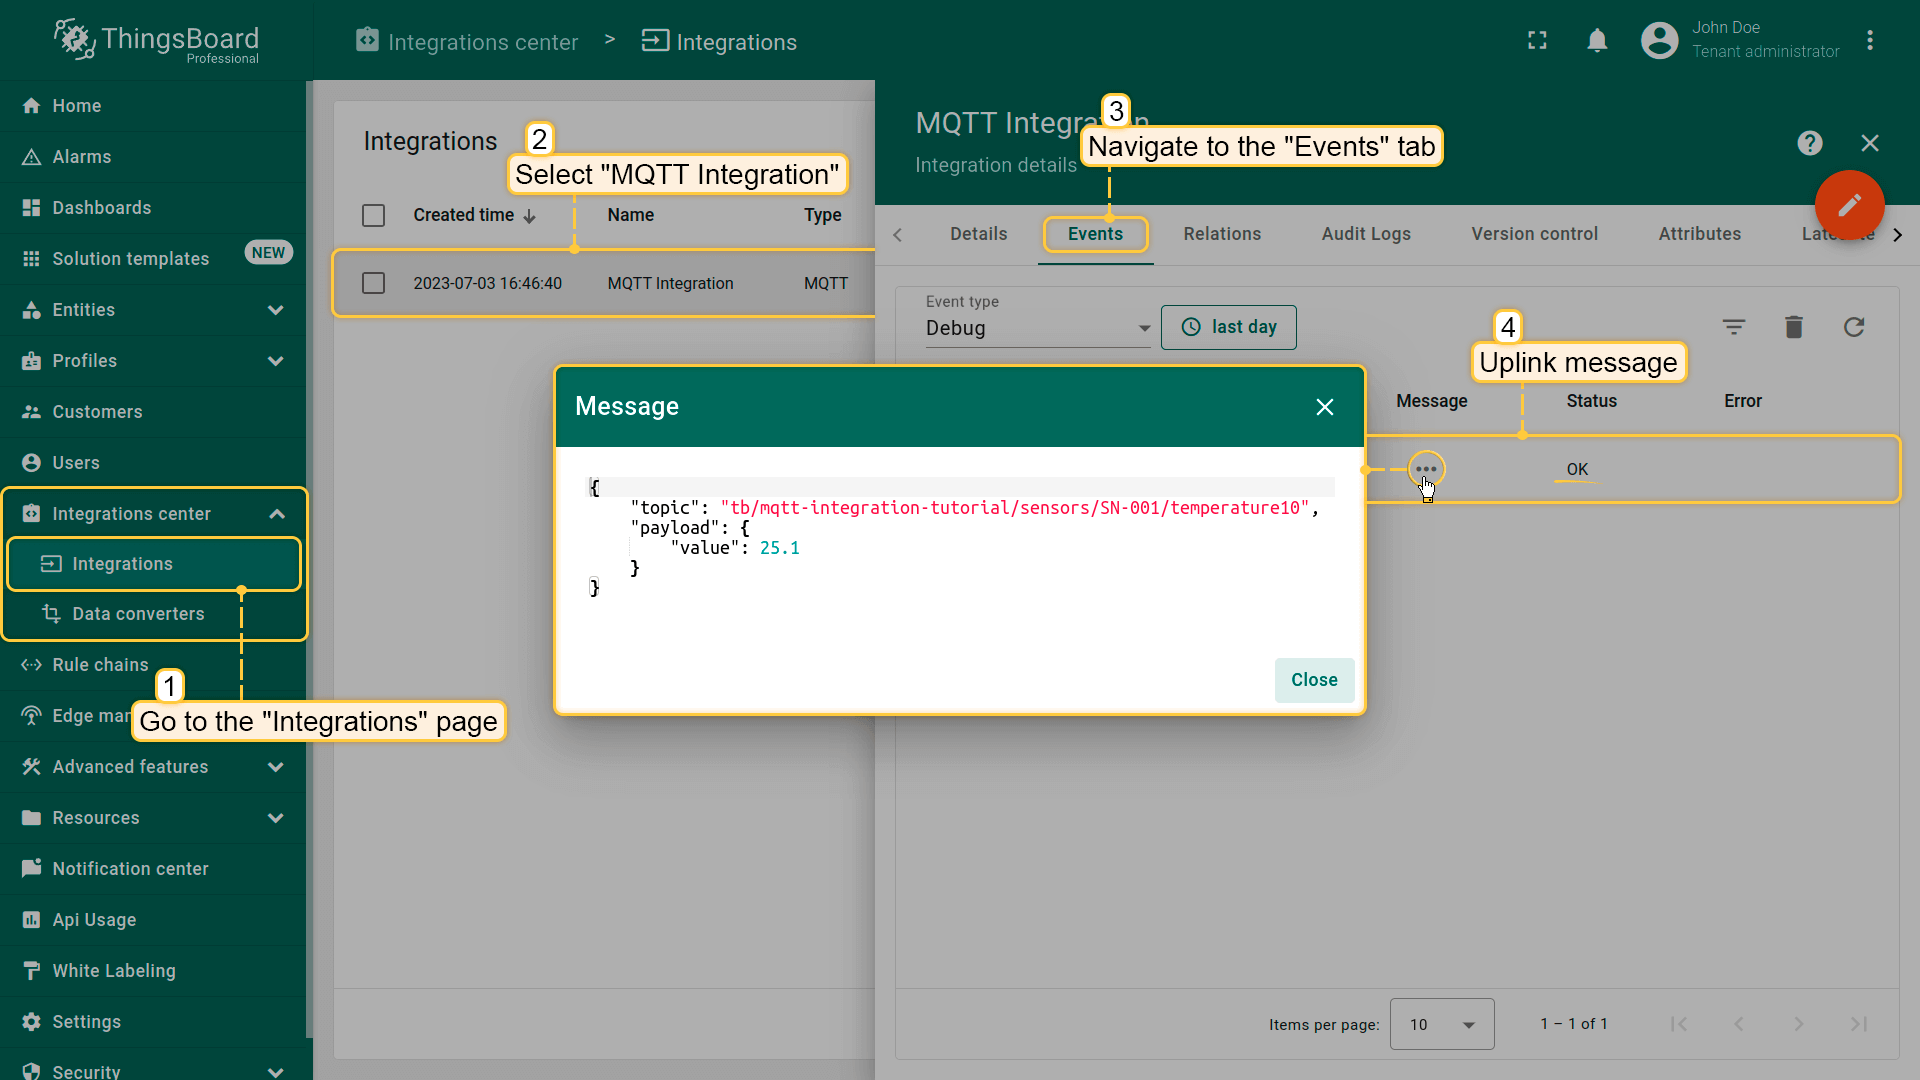
After you sent uplink message, go to your integration in SENTIENT UI and navigate to the “Events” tab. There you’ll see the message consumed by the “MQTT Integration”.
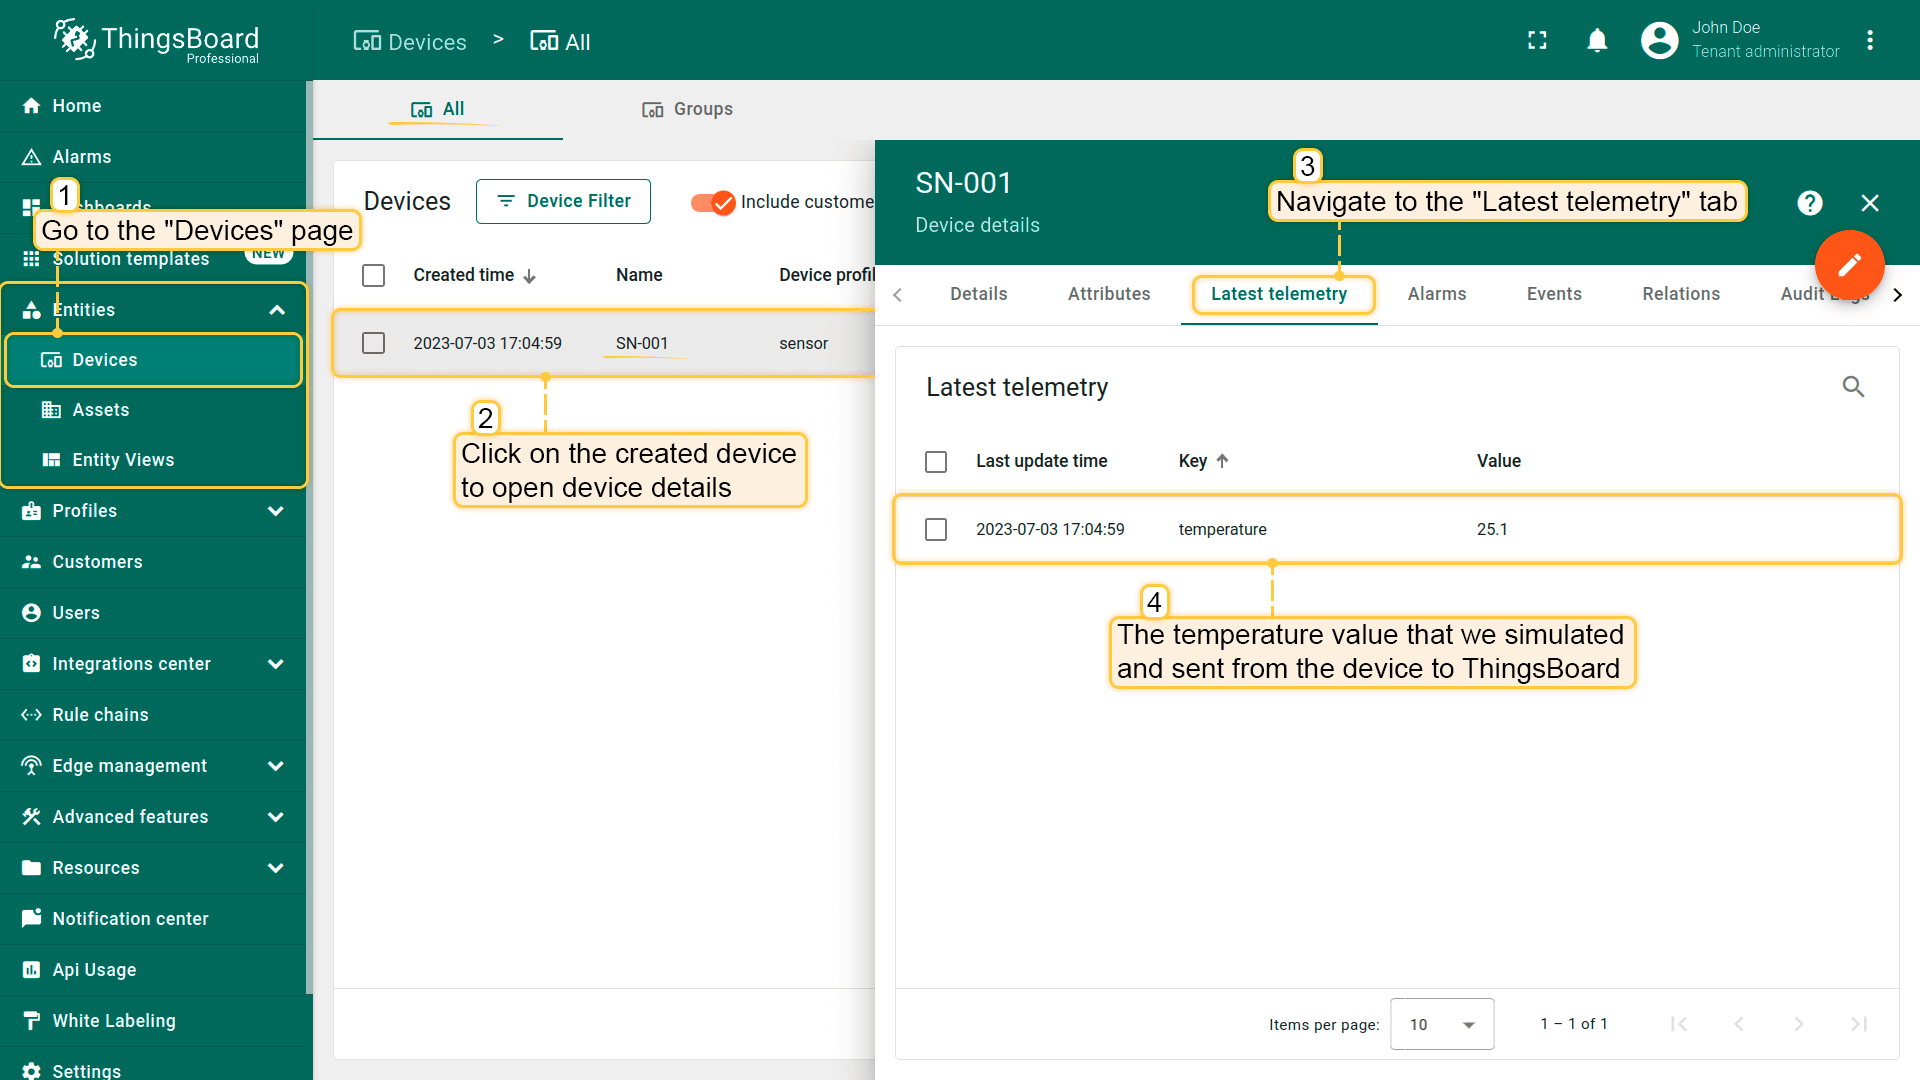
Go to the “Entities” section -> “Devices” page. You should find a SN-001 device provisioned by the integration. Click on the device, go to “Latest Telemetry” tab to see “temperature” key and its value (25.1) there.
Next steps
-
Getting started guide - This guide provide quick overview of ST-RMQTT.
-
Installation guides - Learn how to set up ST-RMQTT using Docker or deploy it in K8S environments on AWS, GCP, and Azure.
-
Security guide - Learn how to enable authentication and authorization for MQTT clients.
-
Configuration guide - Learn about ST-RMQTT configuration files and parameters.
-
MQTT client type guide - Learn about ST-RMQTT client types.